

How To Reinstall Back Up Camera In 2013 Fj Cruiser

- Dwelling
- Forums
- Vehicle Tech Forums
- 100-Series Cruisers
You should upgrade or utilize an alternative browser.
Slee'southward new Backup Camera Bracket Install (1 Viewer)
- Thread starter paflytyer
- Start engagement
- Joined
- Sep 27, 2011
- Messages
- two,597
- Location
- ColoRADo
- #1
Slee and Joe Risavi to the rescue. Hither's how to remove your backup camera, rewire information technology and reinstall it on the mounting bracket. The bracket mounts to the spare tire carrier.

The camera mounts to the bracket via tabs provided in the kit and the screws that were belongings the camera in its original location.

Start, yous demand to remove the camera from your hatch. You could do it a couple means. Popular the license plate lights out and remove the screws holding the photographic camera to the hatch. Then try and get your fingers in there and release the tabs. Or Joe's recommended method, remove the screws from the camera and use a footstep drill and simply drill out the plastic tabs. Slee will near likely provide new ones in their kit


The camera will come right out. Pull it out as far as y'all can and clip the wires past the wire connector. Yous'll only get a few inches of wire past the connecter, just go equally much as you can.


Unplug the connector and mount the photographic camera to the bracket.

Now you demand to become to the photographic camera wires that feed up to your in-dash brandish. They are located in the rear quarter panel near your jack. First remove the flap that covers the gap between your cargo surface area and back hatch. It'south 5 or 6 screws. So remove the T that's used to secure your cargo internet. This T just twists and pulls out. There is a screw behind there that needs to be removed.

Now you lot tin can pull that console away enough to access the photographic camera wires.

The bundle you lot're looking for has 4 wires going into the connector. A Black, White, Red and a Bare wire covered in black tape. The whole packet is covered by a white/Dark-green wire cover a few inches up from the connector.

Unplug the connector and prune the wires leaving about half-dozen or vii inches to work with.

There is a black plastic oval plug that's down beneath those wires. If you go nether the truck it's easy to see. This needs to be popped out.

Apply a long screwdriver and simply pop information technology out and set information technology aside. It will fall out pretty like shooting fish in a barrel.


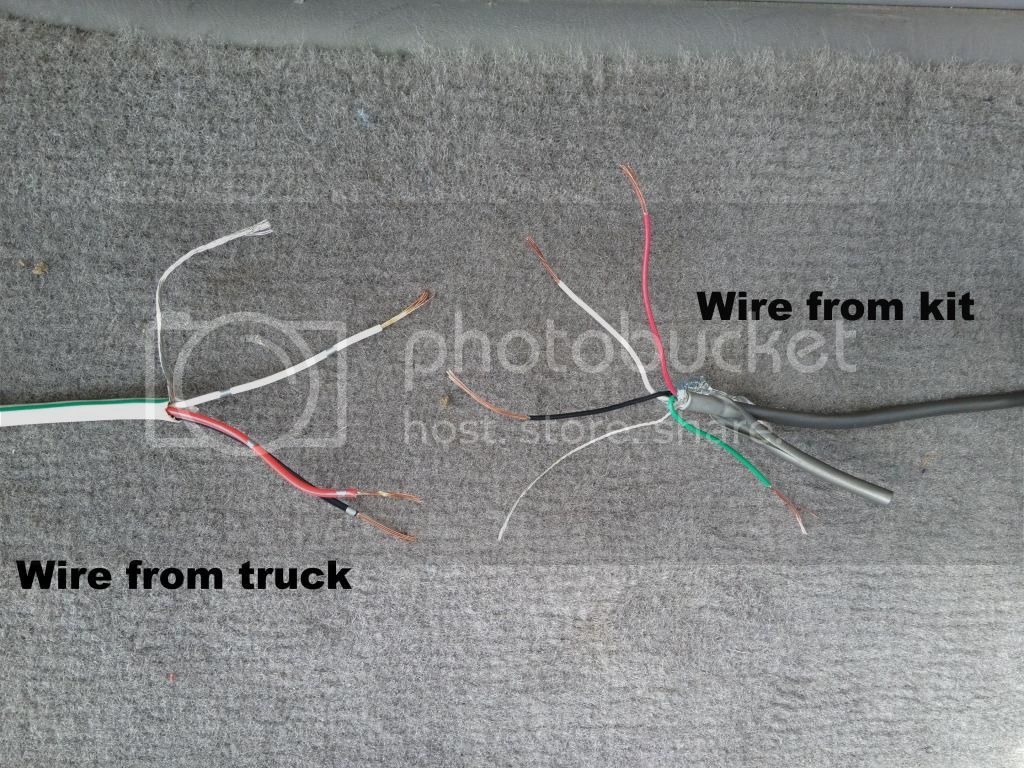
At present it'southward fourth dimension to solder some wires together. Using the connecter and 6-vii inches of wire you lot just clipped, solder everything together with the wire provided by Slee. The wire Slee provides is just 22ga dwelling security wire used for wiring homes/business. (Great find Joe)
This bundle has 5 wires in information technology. Blood-red, Black, White, Bare and Green. Yous're going to lucifer color to color with your clipped package and just disregard the green wire, information technology's not used.
Now that you've just extended that wire, accept the black oval piece you popped out before and drill a small pigsty in the centre enough for the security wire top pass through.

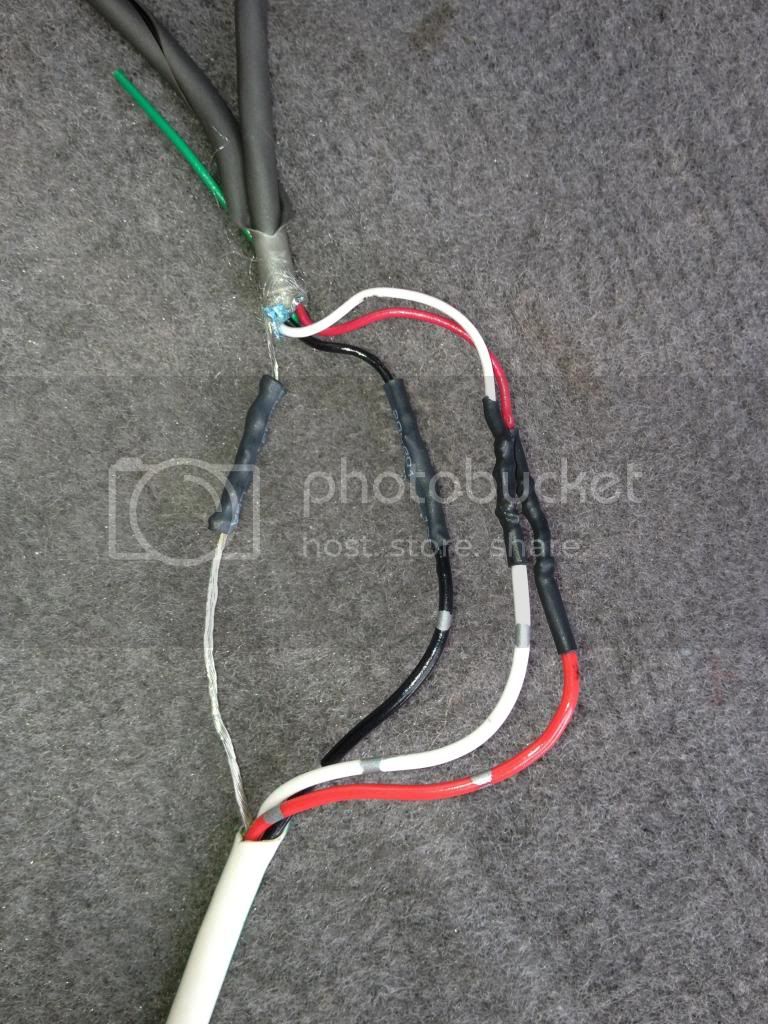
The next step tin exist done a few unlike ways. What I did was feed the security wire through the opening in the torso where I popped the black oval plug out. I pulled all the security wire through and fed it through the black oval plug. EDIT:This adjacent movie shows the wire feeding through the plug the Wrong way. Feed it through the waffle side of the oval.

And then I reinstalled the black plug into the body. I used a little silicone around the hole the security wire passed through just to seal that plug back upwards from water/mud in case I always get that deep. Y'all tin can plug that connector back together now. All you were doing was extending that part of the wire five or vi feet with the security wire.
Adjacent, I ran the security wire underneath the truck/bumper to the rider side and upwardly betwixt the bumper and the torso where your license plate light wire is run. (I promise that makes sense, Ill snap a pic tomorrow) Basiclly information technology'due south run to the swingout just similar the wire that provides power to the LED licence plate lights on the bumper. I besides null tied the security wire upward under the bumper to keep information technology out of the way.
Now you lot have to solder the security wire to the section of wire y'all clipped when yous first pulled the camera out of the hatch. You but have a few inches of wire to work with here, and so do information technology right the offset time. Lucifer color to color again disregarding the dark-green from the security wire. This time the Brown wire from the camera side connects to the Bare wire on the security side. I didn't have a picture of the 2 connecting, but this is the plug and few inches of wire I'1000 talking most.

- Joined
- Sep 27, 2011
- Messages
- 2,597
- Location
- ColoRADo
- Thread starter
- #2
Run that newly soldered plug along the swingout and up the heart of the backside of the tire carrier and plug it in to the camera/plug that you mounted on the bracket earlier.
Hop in your truck and put information technology in reverse and make sure you did everything right.
This is why I similar a backup camera..

The last thing you need to do is address the hole in your hatch left by the camera. I went downwardly to a plastics shop here in town and bought a business card sized piece of ABS plastic.


I know it's a little crooked, it bugs me too. I'll get back to it and straighten it out.

That's it, yous just relocated your backup photographic camera with Slee'south new Fill-in Camera Kit.
Camera Bracket
a few feet of Wire
4 OE plastic tabs
any additional hardware needed
I'k non 100% sure on what pricing is going to be, but it's non much.
I really like the fact that I know EXACTLY where the edge of my tire is. The only negative I see will be when you're running a Trasharoo. All you're gonna see is the close up backside of a garbage bag. I'g playing with a few options on what to practice there.
- #3
I would like to run across the mount exist fully enclosed on the screw side to deter theft. These cameras are quite pricey if you have to replace one.
- Joined
- Sep 27, 2011
- Letters
- 2,597
- Location
- ColoRADo
- Thread starter
- #iv
I would like to come across the mount be fully enclosed on the screw side to deter theft. These cameras are quite pricey if you have to replace 1.
That'southward a adept bespeak. I'chiliad gonna await at it today.
Go far touch with Christo at
1-888-4X4-SLEE
Tel +ane (303) 278-8287
He might have a better idea. Although, information technology'southward pretty inconspicuous unless you know what you're looking at.
- #5
Great idea. I've been looking to do the aforementioned thing for a while now.I would like to come across the mountain be fully enclosed on the screw side to deter theft. These cameras are quite pricey if you have to replace i.
That doesn't make any sense since you tin can as hands remove information technology from hither as the stock location? What am I missing, other than it is a little more visible in this location vs under the hatch.
If i is concerned about that, it would be better to go a security type fastner similar an allen head with a pin in the eye.
- Joined
- Jul 23, 2008
- Messages
- 400
- Location
- Denver, CO
- #vi
Withal, I run a wheel rack from time to time off the tire, gas can or Trash a roo.., And then I estimate I am out on this mod.
- #7
BTW that Toyota camera is quite generic... the camera itself could exist replaced for $xxx (minus the plastic bracket). Even the wiring for it is generic.
Nice that there is a bracket for the spare tire. As I shut in on a rear bumper purchase it'south one less thing I volition need to fab upward.
ntsaint
Don't Assume I Know The Basics...
- Joined
- Oct xvi, 2010
- Messages
- vii,293
- Location
- Louisiana
- #viii
Anyone know if i of the wires for the opposite cam is the actual Rev+ light? If so I can tap both the camera and the light in here...
- Joined
- Sep 27, 2011
- Messages
- 2,597
- Location
- ColoRADo
- Thread starter
- #nine
I've got to relocate my reverse cam and want to wire in an aux light that's reverse activated at the same time.Anyone know if one of the wires for the reverse cam is the bodily Rev+ light? If then I can tap both the camera and the light in hither...
Andy,
I don't call up so, (99.v% sure) only it wouldn't be difficult to check. If y'all unplug the camera connector and put your truck in "R", the camera won't come on, but I think the opposite lights notwithstanding will. You could easily tap into the reverse lights at the aforementioned fourth dimension as you relocate the camera/wiring. That bundle is in the same area.
- Joined
- Sep xiv, 2011
- Letters
- 1,233
- Location
- San Diego
- #ten
ntsaint
Don't Assume I Know The Basics...
- Joined
- Oct xvi, 2010
- Messages
- 7,293
- Location
- Louisiana
- #xi
ntsaint
Don't Assume I Know The Nuts...
- Joined
- Oct 16, 2010
- Messages
- 7,293
- Location
- Louisiana
- #12
ntsaint
Don't Assume I Know The Basics...
- Joined
- October 16, 2010
- Messages
- 7,293
- Location
- Louisiana
- #13
And this is a lot longer chore when you lot have a drawer system bolted in that has to exist unbolted commencement!
- Joined
- Sep 27, 2011
- Messages
- two,597
- Location
- ColoRADo
- Thread starter
- #14
Nevermind. I went ahead and drilled it.And this is a lot longer task when you take a drawer system bolted in that has to be unbolted first!
Much easier to just drill the plastic tabs. Toyota sells them for less than $ane.00 I recall.
ntsaint
Don't Assume I Know The Basics...
- Joined
- Oct 16, 2010
- Messages
- 7,293
- Location
- Louisiana
- #15
- Joined
- Sep 27, 2011
- Messages
- ii,597
- Location
- ColoRADo
- Thread starter
- #16
I bet those drawers added an hour or two to this install.
ntsaint
Don't Assume I Know The Basics...
- Joined
- Oct 16, 2010
- Messages
- 7,293
- Location
- Louisiana
- #17
Yeah I painted it yesterday and then it would exist good and dry before install today. Had to be black! Could've done this in an 60 minutes to an 60 minutes and a half without the drawers. Those and a trip to the hardware shop made it iv hours. Still cracking though. 60 and sunny today. Good day to be out.Nice! I dipped my bracket too.... it didn't looked right with the wheels and stood out too much. Stealth Manner approved now. I bet those drawers added an hour or 2 to this install.
- Joined
- Feb 26, 2007
- Messages
- 89
- #18
- Joined
- Sep 27, 2011
- Letters
- 2,597
- Location
- ColoRADo
- Thread starter
- #19
- Joined
- February 26, 2007
- Messages
- 89
- #20
Can you lot explain what are you trying to see? I may accept a motion-picture show. The camera is located under the hatch. Once the bumper with tire carrier is installed, it blocks the cameras view. Or, are you asking for the expect after the camera has been relocated?
Sorry, I thought the photographic camera is coming stock with stock spare carrier, because I have the spare tire carrier, this is what I did but I'one thousand looking for a improve option. Also, can you please direct me to the slee photographic camera setup parts. Thanks!
Similar threads
Users who are viewing this thread
- Home
- Forums
- Vehicle Tech Forums
- 100-Series Cruisers
- This site uses cookies to aid personalise content, tailor your experience and to keep you logged in if you register.
Past continuing to utilise this site, you are consenting to our use of cookies.
Source: https://forum.ih8mud.com/threads/slees-new-backup-camera-bracket-install.725130/
Posted by: wallacesweves.blogspot.com
0 Response to "How To Reinstall Back Up Camera In 2013 Fj Cruiser"
Post a Comment